Friday, December 25, 2015

Inside The Looney Bin Part 2: The Upstairs

     Lord, I need a time manager. Someone to say "HEY ! It's been like 2 weeks since your last blog post, get off your arse and write something." Of course, I must play the school card. I just finished the first semester of my senior year at UIUC and I'll admit it; my course load kicked my butt. Five very challenging classes, but finals are over and I'm home till Jan. 20.  Only five more classes to go and I'll graduate in May. It only took 40 years. I'll save that story until I'm closer to pomp and circumstance day.

So, let's go upstairs. We managed to squeeze in three small rooms above the great room downstairs. There is a very small office for me, about 64 SF, with one window. Limited floor space but lots of vertical space for future shelves and maybe even a small loft bed  extending over the doorway,for a grandchild. Please note my temporary desk made from a hollow door we yanked from the old decrepit house. Keith cut it to fit the curve of the wall. Handy guy, my guy.


See that stack of texts, left side, top shelf of short metal shelf rack? Yeah, ten required novels for my American Literature 451 class next semester.  We'll be reading books written from 1914-1945; Faulkner, Hemingway, Langston Hughes, Eliot, etc...After my winter break, it's unlikely I'll get much else done but reading and driving, reading and driving. The university is 1.5 hours from The Poor Farm, one way (up hill both ways.)  Oh well, you can't be much of a writer if you're not a reader, can you?
 
Heading down the steps from my office, across the landing and up on the other side, we have our small library which will contain books other than my textbooks. It's not yet painted and the floors are unfinished and the room is serving as our closet, so you'll have to use your imagination.
 
 
On the other side of the library wall is our bedroom which is also petite on floor space, but ripe with vertical possibilities. It has been painted, floors finished and soon Keith's desk will move into the library and our hanging clothes will move into the bedroom. We'll build a small closet in the space where the desk is now.


     The tall black pipe is part of our rocket mass setup, venting whatever heat has not been absorbed by our concrete floors below, up and out the roof. The hole in the ceiling above our bed is to the opening where all the grain used to be blown into the grain bin. Eventually it will be a skylight. Now, it's just bolted closes and stuffed with a big piece of foam covered in plastic to reduce heat loss.

 
     Yes, interior designers, I am aware that my horse pic is off center. It's super heavy, made of sculpted plaster and had to be hung on a wall stud. I'll balance it out with some other piece of wall art soon. The bed is a Sears catalog item my Chicago grandparents bought in 1919. I gave it a new coat of bronze spray paint before moving it in here.
 
     Meanwhile, back in the kitchen; progress continues on our "custom" counter top. It took awhile to figure out how to make the curved frame which will hold our concrete counter top but Keith did a great job with it.
 
 
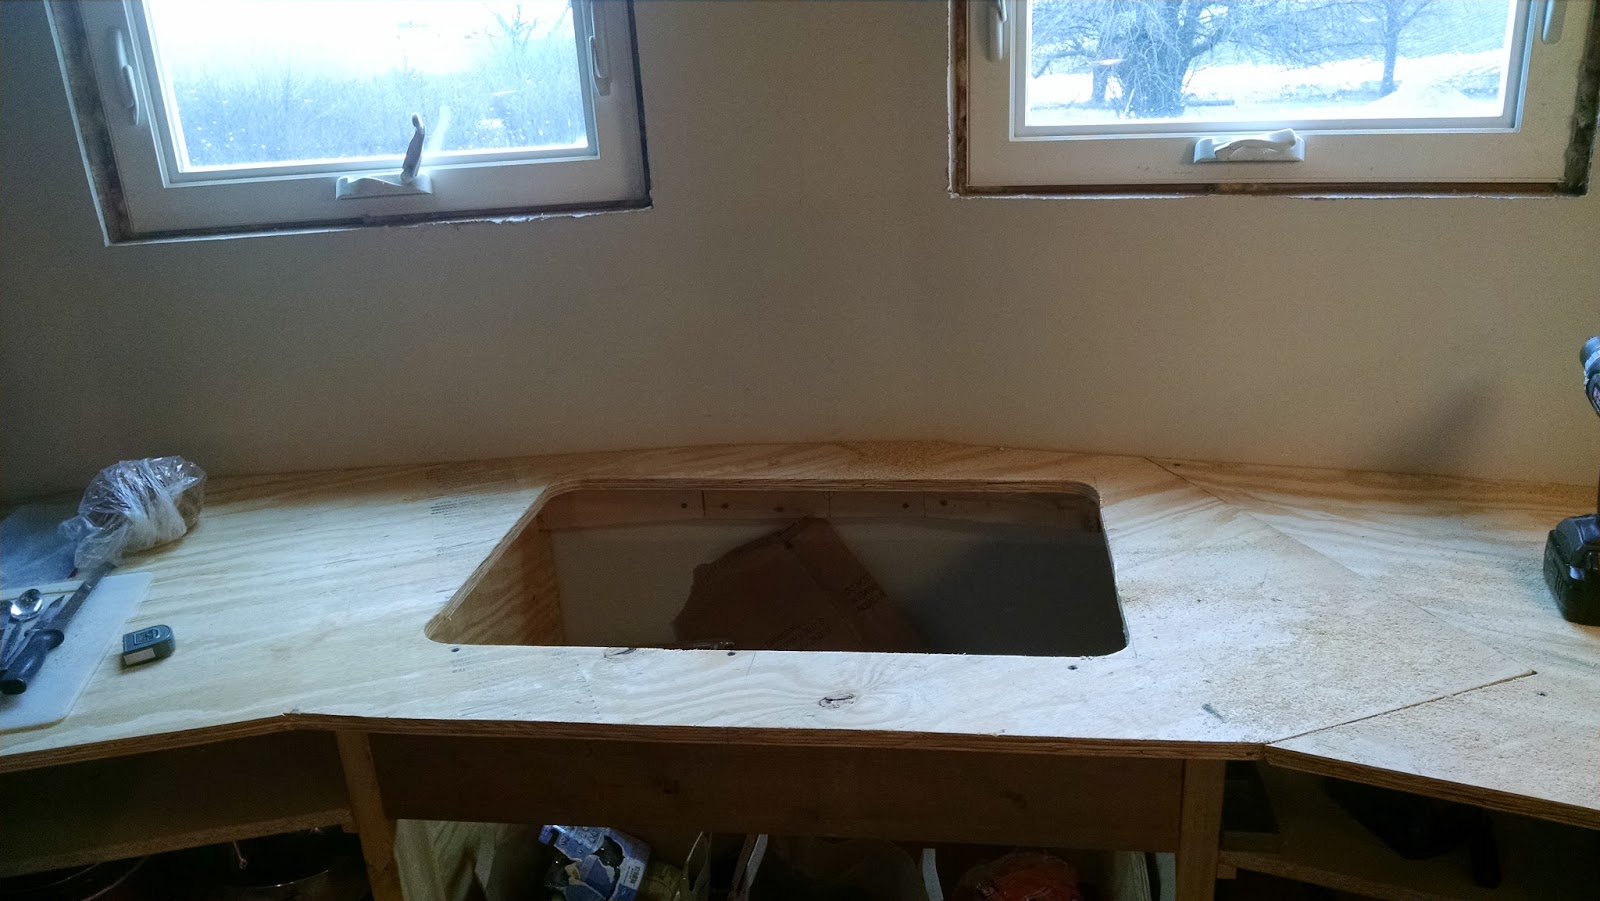
     But, just as we were getting ready to drop our $15 Restore composite molded sink into the cutout space...we noticed a large crack in the bottom. We considered repairing it but if it leaked we'd have to chip out all the concrete in the counter to replace it, and no way did we want to do that. So we shopped for another used sink but when we couldn't find one we decided to use the stainless steel sink in the decrepit house, but dang, if it wasn't rusted out on the bottom. A new sink was not in our budget so we called our wood guy, the one with 7 buildings filled with stuff who supplied us with our floor joists, upstairs shiplap flooring and beams. It took about 30 minutes of searching through his "inventory" but buried deep we found this gem below.


     Circa 1940, it's a Crane cast iron sink. The sucker was super heavy, about 70 pounds, but once cleaned up we knew we'd scored well. Only $25 and I've seen similar models on EBAY for several hundred. It took real effort to get it in its new home but now we're ready for the concrete countertop pour. Hopefully, tomorrow or the next day.


Just one more thing. For Christmas our daughter Raven gifted us with this stunning photo frame filled with our four beautiful grandchildren, ages 14 to 4 months, which just happens to fit perfectly in the space between our two kitchen windows. Coincidence? I think not.


Thursday, December 10, 2015

Inside Uncle Lesters Looney Bin, Part 1. The Downstairs

 
 As school winds down, I have 2 more written finals, one oral final in Italian, (Mama Mia!) a large multimedia project and an essay, I find myself aching to get busy with the completion of the inside of our grain bin house. Which, by the way...has a new name. A couple of weeks ago Keith was at a family reunion trying to explain to his elderly Uncle Lester, what we were living in and why. Uncle Lester's response? "You're living in a Looney Bin?" Actually, it's a grain bin, but Looney Bin has more charm don't you think?
 
. As a refresher, our inside living space is a 21 foot diameter repurposed grain bin which we bought for $1500 and had moved to our farm. It provides us with a bit less than 700 square feet of living space divided into one open kitchen/dining/living area downstairs, a small bedroom, very small office and library space upstairs. We heat entirely by wood, do not own a dryer, microwave or dishwasher.
 
So, join me for a walk about inside
 
The downstairs is 50% complete. Walls are painted, the concrete floor has been sealed, most of the lighting and plumbing is complete and we have furniture. The dining area looks like this:
 
 
Soon the stairs will have risers and the pantry under the stairs will be closed in. This will be a very good thing because right now any little bit of dirt on the stairs gets dumped on pantry items underneath. Yes, I am aware that if I swept the stairs more often there would be less debris to fall. Please refer to the first sentence of this blog.
 
Our small 20 gallon water heater and short water softener are tucked under the front part of the stairs and have been serving us well. After showering outside all summer with very little water, the 20 gallons of HOT water is a luxury. You'll note the washing machine is blanketed with a coffee maker, and toaster because...
 
 
the actual kitchen part of the kitchen, sink, counters, shelves has been on hold while we wait for saw repair parts to arrive. The two by fours on the walls is the begging of our counter top frame which will support the concrete counter top we will pour ourselves. In the meantime I am washing dishes in the bathroom which is a bit of a pain but nothing like washing them outside after heating up water on an open fire. The cooking magic all happens here now...
 
on my $100 gas stove bought on Facebook (Livingston County For Sale.) It works fantastically and when coupled with the rocket mass stove barrel, I can easily make a large meal on the gas stove while keeping other parts of it warm on the barrel. The large pieces of cement board on the right will be the base for our concrete counter top and when it's moved we'll have enough room to the right of the barrel for a small chair to sit in while we feed the rocket mass heater. We've used the RMH for over a month now and generally only have to fire it up for about 3 hours every 48 hours. It keeps our beloved Looney Bin at 67-71 degrees depending on how cold it is outside. One burn equals approximately the wood in the metal  basket in the photo and you can see that the biggest sticks we use are no more than 3 inches in diameter. It's all junk wood on our property, dead, fallen tree limbs mostly, so nothing we have to buy. Moving around the stove towards the living area we have this scene:
 
 
 a small loveseat and one chair plus a very poor excuse for a Christmas tree. I worried about having enough room for visitors but last Sunday all three of our sons and wives and one baby did quite well in here. The steps can also seat visitors. The front door (also the only door) is located right next to the bathroom.


This view makes it all look bigger than it is. Please note the strategically placed wreath over the not so strategically placed breaker box. That placement decision (of the box, I take full responsibility for the wreath) was made while I was in Ireland last summer, need I say more? To the right of the door is our bathroom which I like to call...


the best Texaco gas station bathroom this side of...uh...Texas. Geez, I need some new towels! Due to cost and time restraints we covered the walls and ceiling with Kemlite wall board, the same stuff we used to cover our milk room walls at our old farm. I wanted tile but it wasn't in the budge so for now I have clean, white and waterproof. Because of the round walls and the stairs that curve above the bathroom the walls are oddly shaped, coming to a point in the back of the shower; but still plenty of room. The sink we took from the old crumbling house on the property, the medicine cabinet was a $15 flea market find with original pink paint on the sides circa 1940. It's super sturdy, a real workhorse piece, I can still smell Noxema and Brylcream in there.  The toilet was new when we realized our large compost toilet was too large for the space, so it remains in the outhouse where it will still get lots of use.
 
The towel racks are simple galvanized pipe, much cheaper and sturdier than conventional towel racks. The floor is just concrete like the rest of the downstairs but sealed with several coats of viscous concrete sealing stuff. I used some powdered charcoal for variety the floor. Not at all sure I like it but at least when we drag in mud after chores it's hardly noticeable.  Oh yeah, that's our dish drying rack in the back of the shower in the middle picture. For privacy...
 
 
a salvaged door from the same guy we bought all our floor joists, posts and beams from. It required digging through a few piles but we were thrilled to find this one as we needed a narrow one, only 28 inches wide. It has some water damage but it's straight and solid and for $15, a keeper. I'll take it down and refinish it over my Christmas vacation time. Obviously there is still more to do, I of course have a list to keep us on track.
 

Tuesday, November 24, 2015

Book Review: How to be a Perfect Farm Wife by Lorna Sixsmith


You have to look closely, but it's there. Wedged between my Italian dictionary (learning a foreign language at 56? What was I thinking?!?) and my Western Civilization Text, (snooze-time) sits one of the best books I've ever read. By "best" I mean most humorous, most helpful, most honest, most absolutely human.

Most of you already know this, but farming is hard. See my last post for my own personal whine on this topic. But the author of this book, "How to be a Perfect Farm Wife," is a woman who doesn't just introduce problems; she gifts her readers with real workable solutions and she does it without being afraid of getting her Wellies all mucked up.

 
The author, Lorna Sixsmith of Garrendenny Ireland, and I, have been blog buddies now for years. Sadly we have yet to meet in person. We tried this summer while I was studying at NUI Galway but schedules and finals would not co-operate, which was probably best because I know she was working like a fiend at that time to complete this second publication of hers. Recently released, its now available for purchase and so worth the minimal investment required.

This well organized book is part How-to-Manual, part Self-Help and part oh my God, did she really just say that? Her sense of humor is self deprecating in the most positive way and her realistic approach to a tough and busy life is loads of fun. In Part One for example she prepares us for the day when money earmarked for a special event gets spent instead on a manure spreader (been there, smelled that) and in Part Six  she tells us how to (allegedly) forge our partners signatures. Good advice all.

Although the text is the perfect smaller size (5" by 8") to carry in a purse, tool belt, or feed sack it still contains a huge amount of information in its 230 pages.  Granted there are fun times to be had in the reading; I personally never get tired of the "Irish Mammy" sections, but there is within these pages a wonderful history lesson as well.  The role of farming in Ireland in general, and the role of farm wives in particular, is presented in part via actual newspaper clippings for wives. Not for wives to read, I mean men looking for wives to marry based on...get this...the size of their acreage. Oh man, those ads boil my blood and make me giggle at the same time; they make fabulous social commentary of the times.  Farm partners have come a very long way over the decades, not just in Eire but here in the U.S. as well, and Lorna does an excellent job of spelling out the challenges of either sex who might be sheep deep in the profession.

Most appreciated was Lorna's ability to address both the seemingly silly, i.e. being wise enough NOT to ask your farm partner if your bum looks big in a particular outfit, and the crucially important advice such as how not to get a divorce. When your farmer hubby asks for a meal before you've finished the last farm task, she tactfully suggests you quietly had him the potato peeler. Doing it with a stabbing motion is entirely optional.

Filled with recommendations, anecdotes, recipes, historical content and useful hands on advice, "How to be a Perfect Farm Wife" by Lorna Sixsmith would be a great Christmas (or birthday or St. Patrick's Day or National Alien Abductions Day) gift to any farm wife, farm love, farm lover, farmer lover, farmer wife wannabee, etc..etc...It is so much more than a collection of interesting stories and useful advice; it is also testimony to those who make their living in agriculture, a skill millions of people rely on, yet few fully understand, let alone appreciate. Small family farms are disappearing every day, here, in Ireland, all over the world, but this hemorrhaging of talented individuals, the experts in land and animal management, the farmers, can be slowed, maybe even reversed with enough community support. Lorna understands all that and so will you after reading, "How to be a Perfect Farm Wife."

There ends my review, I hope you found it useful. Because I am the last in line of Lorna's Book Blog Tour I'd like to redirect you to her site so you can read other blogger reviews as well. Have fun!
http://www.lornasixsmith.com/book-blog-tour/

Saturday, November 21, 2015

Homesteading is Not for Weaklings, Woosies, Wankers or Wannabees


Since the grain bin house is now in it's final stages of completion: painting, light fixture hanging, floor trim, counter top building, etc...I will shift focus outside now and then, to the rest of our homesteading world.

Sadly though, it took a turn towards crap this past week; our bovine extraordinare, Polly, died.

The vets's term is "Hardware disease." The cause of death was organ failure due to ingestion of a foreign object; she ate metal. This has been a concern of ours since we bought this land two years ago and even more so, when we moved our livestock here in April. These 7 acres were filled with trash, much of it on the surface and large portions partially buried. It had been owned by a bank for a few years and prior to that owned by someone who cared not for the land. Polly was the last of our animals we brought to The Poor Farm from our old farm. For months we have been hunter-gatherers of century old bedsprings, barbwire rolls, tin cans, piles of glass, rusty fence posts, ad infinitum.  We have made significant progress but apparently it was too little, too late for Polly.

She went off feed first and her milk production decreased, and so with a 7 week old bull calf at her side; we decided to stop milking her to allow him to get enough of the nutrition he needed. From time to time we saw her eating some, drinking some, but on day three of this behavior, concerned about her dehydration status we called the vet. He confirmed our beliefs, gave her a bolus of fluids and antibiotics, something we only use when an animals life is at risk and hers definitely was.

She perked up, got up, but 12 hours later laid down and died.

Thus the crux of this post; homesteading is not for weaklings, woosies, wankers or wannabees. In the midst of the romantic overload of articles in popular magazines, newspapers and idealistic blogs with titles like, "Anyone can Farm " or "Make a Living on 1/2 an acre in 5 Easy Steps" and "You Too Can Get Rich Selling Arugula" its easy to assume that the perfect pastoral life is there for the taking. All one has to do is throw on some Land's End boots, a $90 Eddie Bauer flannel shirt and the country life will surround you with all her milk and honey goodness. But, honest homesteading is hard: physically, emotionally, monetarily and spiritually.

 It's not like we haven't lost animals before. Life does indeed involve death. But Polly was gentle and kind, a joy to milk. Cows like that are rare. Her loss hit us hard because we cannot easily replace her; she was not a pet, she was our sole source of milk. Soon we would also be using all that milk as our sole source of butter and cheese as well. There is no longer a large herd from which we can pick a sub. Small dairy farms in this area, where its likely we could obtain a healthy cow, are limited. In addition, a replacement cow can easily cost $1200 or more. If we buy a young heifer for less, it will take a year of more before she is bred, calves, and can produce milk.

Watching her calf grieve was tough as well. Animals may not feel loss as we do, but they definately suffer when one of them dies, as is clear in these photos of Polly's baby just after her demise.


The little guy stood by her a long time and then finally laid by her side as did our two guard dogs and several of our ducks! A wake of sorts that carried on even after her body was disposed of; her calf laying on the sight where she was last. He's doing well now but it was sad to watch.

So, the first time in  over 22 years, we are without our own milk cow and we face a multitude of problems to be solved. The most glaring one is where to get the raw milk we relay on for our health? We have a one week supply left from Polly and then we are dry as she.

We have become picky in our quinquagenarion years and want raw milk from a 100% grass fed dairy. To our knowledge there are not many of those in Illinois. On our old farm our customers often drove 100 miles for our raw milk. Now we're the ones in a bind. Yeah, the irony. We are considering replacing Polly with a goat but I've never been a fan of goat milk. It's just so...goaty. Decisions, decisions. Guess this wanker needs to get stop whining and find a solution.


Sunday, November 15, 2015

Rocket Mass Stove LIFT OFF!


Grandson Wesley helping out.
 We've been inside the grain bin house for almost a month and although we continue to whittle away at projects big and small (painting my office!) it feels like progress is slow. But, as of last week, we have non-electric, non-gas heat. The rocket mass stove had it's initial lift off last Sunday and we are still here to blog about it.

After planning our stove we realized we were a brick short. (Insert rude blog follower comment here)Finishing it involved creating a brick out of mortar in order to build the heat rising to the appropriate height. Below is a rare photo of me at work. In this process Keith and I quickly learned we have no talent for brick laying. Not an easy job. Dear Jay, you have all our respect.


We then covered the brick heat riser with Kaowool, an insulating material used by those in the refractory business. Dear Jay, you were right, it worked perfectly. To keep this material in place we wrapped it with hardware wire and pulled the ends together at the top. The goal is to keep the gasses flowing up and out of the heat riser keeping this path clear to avoid areas where ash can build up.


After putting the grandson to work with a wire brush on the steel barrel, we placed it over the heat riser. It is not exactly center as we needed to not cover the wood feed channel on the right but we did need to cover the entry to the floors stovepipe network under the concrete.


Once we had it where we thought gases would flow best, we attached the barrel to the floor with cement and let it dry. We sealed the top of the barrel with a fire resistant gasket glued in place with even more heat resistant silicone, and clamped the top in place. We let everything cure a couple days then with two of our boys close by (the fire department on speed dial on their phones) we lit her up.


As predicted by Ianto Evans the author of Rocket Mass Heaters, it took awhile for the new stove "to learn it's job." There was some smoke, ok massive amounts of small that sent our family screaming out the door, as we played with draft, opening and closing windows, blowing on the flame manually, blowing on the flame with an electric fan. Yes, a small amount of the plastic fan covering did melt. What's your point? It took much of the afternoon  but then after everyone else left, the rocket mass stove behaved itself.


The barrel does get very hot when the fire is burning and will boil water. After the fire is out the barrel stays warm for about 18 hours. Great for rising bread, warming buns, keeping foods hot while cooking on the main stove. Since then we have fired it up 4 times. As a rule it heats our small home in an hour bringing the room temp from 63 to 70. One day it brought the room up to 80! If we run it three hours, let the flame burn out, and its mild outside and not windy, it will keep the house warm for 48 hours. A couple of days ago we have 50 mph winds so we had to fire up the stove again after 36 hours. We are guessing in the real cold of this Midwest winter we'll need to run it at least 3 hours out of every 24.


We were thrilled to feel the concrete floor heat up, and stay warm after the fire went out. Even 36 hours after it has run the concrete is comfortable to walk on. No socks needed. We've also learned that round sticks are best. Flat pieces of wood don't burn with the same consistency, often too fast and they burn up the feed channel instead of across it and smoke. We start with small twigs, advance to pencil size sticks and then to larger 2-3 in. diameter pieces of old wood. All of it is already here on the property, tons of dead trees just waiting for us to "harvest" them, with clippers, not an ax. Easy work.


It continues to be a learning process but for the first time in our lives, we are now free of heat related gas bills. That bit of freedom will get us through any little glitch we may still discover with our new Rocket Mass Heater. Special thanks again to Ianto Evans and Leslie Jackson for their great book. Be sure to check out their website Cob Cottage., and our friend Jay Molter of Molter Corporation for all the excellent building materials and how not-to-die-by-fire-advice.

Hot coals in bottom of feed chamber and flame burning to left
towards steel barrel, as it should.