Sunday, January 31, 2016
The High Cost of Free Heat
This past summer my creative writing professor at National University Ireland Galway said this, "There is no fodder without family." He was referring to the wealth of excellent writing ideas right at our fingertips via our family relationships.
I could not agree more.
Per esmpio (yeah, still studying Italian, God help me) a relative of mine recently commented, "Must be nice to have all that free heat." Really? Do you really think you can say that without setting me off on some kind of fuel rampage? People. You kill me. She said lovingly.
Our source of heat, our rocket mass heater, is indeed free of any kind of monthly bill. We do not receive reams of paper every 30 days telling us how many sticks we've burned, the cost per piece of wood, the total amount due and any threats of penalty for non-payment. This much is true, but our heat is far from free. Houseboy Coco (see Mad About You reruns) does not don a thrift store flannel shirt, heavy gloves, clippers and a serious ax nor push a heavy wheel barrel about in order to collect/split our wood. My husband does. I do not pay him in cash for this service but there is the cost of his time, plus maintaining his energy level which requires food and food requires cooking. Cooking requires my efforts and a bit of propane. An extremely fair trade for a warm home in my opinion.
After cutting wood out of fallen trees on our property it is carried into a small plastic calf hut to dry, then hauled in wire baskets to our Looney Bin. From there it is stored alongside our RMH to be placed in the feed chamber of our rocket mass stove at lift off time. After each burn we clean ashes out of the feed chamber which are carried outside and redistributed on our pastures. Genuine homesteading is cyclic.
The wood we burn is in the form of small twigs, larger sticks and split pieces of bigger wood logs which have to be cut back to pieces that are 3-4 inches wide and 18 or so inches long. We use newspaper and smaller sticks or cardboard as kindling. Paper needs to be collected, sticks and cardboard must be cut into smaller pieces. When we start our fire, we must restock it every 15-20 minutes as it burns hot and fast. Usually we use the RMS once a day for about 2 hours if temperature is above 30 degrees, but if the weather is around that 10 degree mark we run it twice a day for a couple hours in the am and about 4 hours in the evening. On average the Looney bin internal temp on any given day is 65-72 degrees.
Today the temp is 50 (!) so we've not needed to run the RMH in almost 48 hours. But it is winter in Illinois and this freak of nature will subside and we'll be back to using our source of cheap but certainly not free heat. Yesterday I was thrilled to hang clothes on the line...in January no less. We have no regrets about our decision to get off the natural gas grid and feel the amount of time we use to keep ourselves warm well offsets the amount of time we would have to work off our homestead in order to pay someone else to supply our heat.
It is all just a matter of choice.
Friday, January 8, 2016
Beauty is in the Eye of the (Concrete) Beholder
After 6 months of washing dishes outside, literally at times under the stars and full moons, and another 2 months of washing them in the bathroom of our looney bin house; I am beyond thrilled to announce the arrival of permanent forever and ever kitchen countertop!
We planned for a concrete counter top for the primary reasons of cost and functionality. We watched many, many Youtube videos, consulted with our friend Jay, a true concrete expert, and then we just dove in.
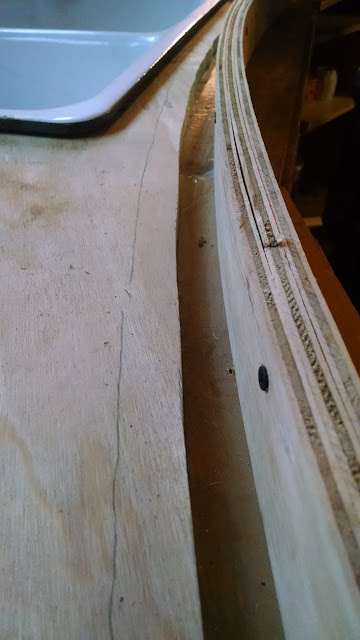
Building the frame was a huge challenge Keith met like a pro. Made of 3/4 inch plywood, it was built in place and attached directly to the studs of our wall. Getting the front curve just right was a stroke of brilliance. Keith leaned the plywood up against a wall in the old house and it "bent" over time.
We wanted (ok ME, I wanted) an undermount sink, so after scoring a 1940's enamel, cast iron beauty for $25, Keith cut a hole for it and then built a mold to cover it. The holes in the middle of that mold allowed us to cut the mold out when the counter was done. We used small sections of PVC for the faucet holes, caulked in place so they would not move when the concrete was pushed in around them.
To give the concrete even more stability we laid in some old hog wire and then two pieces of thick rebar just behind and in front of the sink. We mixed the concrete one bag at a time in a wheelbarrow and colored it a dark grey with liquid concrete dye. Then, shovel full by shovel full we plopped it into the mold and spread it around by hand in order to get it well into all the corners. We used 9 bags of concrete in total.
As thick as it looks, it was still plenty wet enough to screed the way we needed to in order to work the aggregate to the bottom and bring up more of the concrete 'cream" for a smoother surface...we hoped.
Getting the concrete spread in and around the sink and faucet holes was tricky and the end result is far from perfect but after unmolding we were able to grind down the rough patches and the faucet (with some extensions) fit beautifully. We let it cure for three days. Easy to do since we had a major ice storm the day after we poured the counter and we were without power those three days. The mold came off easily but the surface was very rough. What can I say? We're amateurs. I tried to spread a thin slurry across the top to fill in small pin holes when in hindsight we realized if we had just sanded the top well, it would've gone better.
I contemplated many ideas for a backsplash, tile or fabric covered with plexiglass, but finally decided on three good coats of washable semi-gloss paint in Swedish blue. (See below) Since we had the paint on hand already it met all the must-be-cheap criteria I harbored. I still need to figure out some sort of durable trim where the counter and backsplash meet but for now we are in culinary business! The counter, just like our looney bin house, is far from perfect but since total cost was less than $200, including the shelving below, it is exactly the work horse we dreamed of for this homestead of ours.
Subscribe to:
Posts (Atom)


