Monday, October 19, 2015

We're In !


The joy of drywall.
 
We set October 17 as our move in date, after realizing  Oct. 1 would never happen,
and moved in we are...we'll our two cots, electric tea pot, one table and two chairs have moved in. But there is not going back for these two ex-1978 Shasta inhabitants. I now hate that little camper and must burn it. Later, we have other priorities.

Our current kitchen/dining table/office. Yes, Professor Jones this is the atmosphere
in which I write all those brilliant papers, you know, the ones with jelly on them.

Our current bedroom. Two cots side by side and a few quilts.
We call it home. Please note our fancy 1960 kids chairs as end tables.
 
Although dry walling was completed 4 days ago; we caved and hired a couple eager guys, none of the walls are yet painted. Just lollygagging around with midterms mostly. I have sucked up two tons of drywall dust though both into my shop vac and my lungs preparing for this painting task. So many color choices but sadly only so many color choices on clearance at Menards. Barney Purple at $5 a gallon is looking pretty good compared to Mediterranean Sea at $36 a gallon.


In the meantime I got started on the floors. Funny thing happened on the way to drywall euphoria. Neither Keith or I thought to tell the guys to cover the floors before putting on the drywall mud. I suppose they assumed the less than perfect looking boards to be a sub floor. I was at school that day and Keith was working for another farmer. Crap. We got tons of it on the floors. But with scrapers, water, optional profanity and shoulder muscles I was able to clean the salvaged wood Keith so hard to install. After a coat of water based polyurethane they are looking very doable indeed.

On top, the cleaned up floor boards
on bottom the drywall embedded ones.
Our bedroom floor with one coat (so far) of poly.

Yesterday our three amazing sons got to work on other projects. Colton installed out toilet ( OH HAPPY DAY !!! The late night trips to the outhouse were getting Brisk. It was just 29 degrees the other night) while Kyle did the copper pipes for the water softener and water heater. Jason helped with all the bathroom walls; we're putting cheap water proof Kemlite in for now.

No time to tile, winter is almost here, we'll do that in the spring when it's outdoor shower season again. And Colton ended the day helping us lay the drainage tile for the leach field to complete our septic system. We have a very long way to go yet but the end is in sight. Frankly we could not have done this without our three sons. We owe them so much. Thank you also to the daughter-in-laws who have tolerated loss of hubby time for our project.


Industrial garage chic. Copper pipes and Kemlite.

Saturday, October 3, 2015

Sealed with Everything But a Kiss

A couple of days ago our second layer of insulation was completed in the Grain Bin House and we are so thrilled with the results! Even though the top portal of the grain bin is still open, and the peaked roof on the second floor is not insulated yet, the added insulation has made the entire grain bin nearly soundproof. With all the windows and the one door closed you can not hear the wind outside (so when the tornadoes come we are blissfully ignorant) and there is virtually no air movement inside at all. Fresh air is easily obtained by opening one of our 7 windows.


R2D2 and 3CPO were
responsible for the power
needed to blow the cellulose into the
wall frames
Cellulose Insulation


Before Honneger Insulation applied the cellulose insulation (which went over the bright green thin layer of closed cell insulation that was sprayed directly on the inside metal walls of the bin a few weeks ago) they sprayed the joints between the wood wall frames and the wavy inner wall of the metal grain bin with foam insulation.


Then they nailed up sections of plywood over the framing to hold the insulation in place and allow for tight packing of the material. They removed the plywood and covered the cellulose insulation with a fine netting to keep the cellulose secure until the drywall goes up.

Grey on left is packed in cellulose after plywood support is removed
and before netting is attached to hold it secure before drywall
is attached,
The troublesome peaked ceiling will be insulated AFTER the dry wall is applied. The guys had hoped the netting would be strong enough to hold the insulation up in the rafters as it did on the main floors but it was not.
Failed netting attempt in ceiling rafters of second floor
So, that area will be insulated by attaching the drywall and then blowing in the cellulose through the opening up at the top of the roof peak. What has been amazing about this whole process is how much each worker we hire has been so committed to doing this unique project well. Everyone is fascinated, or at least pretends to be, by the challenges of dealing with round walls and they have all worked hard to come up with the best solutions.


My husband of course, being the most committed and hardest worker of all.


Monday, September 28, 2015

Reach for the Sky you Rascally Rafter You


We have doors and windows !

Tiny office at top, small bedroom to right and the rest is library/lounge.
About 350 square feet total in the upstairs.

We're really moving now! Room divisions have been made on the second floor ; a teeny office for the writer chick, a modest bedroom for the chick and her guy, and a decent enough sized library for most of the books neither the writer chick or her guy could ever part with. (Yes, I understand one should not end a sentence with a preposition but I am a creative writer. Which means I can make stuff up.)

Our challenge though was how to build the walls all the way up to the peaked ceiling and then how to put in the ceiling rafters which will hold the drywall which will hold the insulation up against the top of the bin.  Keith and our son Jason worked it out though and as you can see...it was genius. The height of the walls will make even the smallest room look bigger and give us more vertical space for storage.


In the corner of our bedroom where the rafters meet the grain bins top portal we will one day put a skylight. But for this winter that portal will be in the closed position and we will insulate it with a circle of foam and some kitchy fabric wrapped around it for fun, you know like how your orthodontist used to put pics of Davey Jones on the ceiling above you so you wouldn't notice the pain in your mouth as he wrapped ungiving wire in and out and around and through every crooked tooth in your head?

But I regress.

So back to rafters. Keith once again used a combination of used and salvaged wood, since looks didn't matter only structure did. It took him many hours to cut each rafter in order to get it to end around the portals circular opening plus lots of shims and small wood blocks to keep it somewhat centered. Oh how I wish I could afford a skylight or stained glass for that opening RIGHT NOW, but we cannot. All in good time my pretty.


Last weekend our son Kyle did the majority of the inside electrical work and we only have a few more lights to buy. I scored on a bathroom light for $6 at Menards on their lower clearance shelf, a cool outdoor light for $4 and an overhead light for my office for $3 at the Restore (Habitat for Humanity in Champaign) as well at 8 wall sconces for just $6 each at PACC salvage store in Urbana. Lighting and electrical work is crazy expensive so we are so thrilled we have two sons who love to play with voltage or is it ampage? Me...I never touch the stuff.

Tomorrow, the whole place gets another dose of insulation, blown in cellulose behind all the framing, and on Friday the dry waller comes. It's been an exhausting few months for everyone but it looks like we may get inside this little metal cone yet!


Guard dog Fannie and Tiger the cat take a break


Saturday, September 19, 2015

Well, well, well...


Now you see it


Now you don't
Ah yes, once again the blogger goes missing. Proof that life has gotten even busier. I returned to UIUC full time last fall and now this fall, I am officially a senior senior.  With luck and tons more ink for my printer, I'll graduate with my degree in creative writing in May. Meanwhile back at The Poor Farm, construction on the GBH continues. Much has been accomplished which is indeed Martha, a good thing, since our move in date is still projected for Oct 17.
 I am aware that at one time I said the date would be Oct. 1. I was fully outfitted in rose colored glasses that day. With Keith working here and there for a farmer friend of ours during this harvest season, plus Keith's mishap with the circular saw that required 17 stitches in a finger (he is ok and the finger is healing well)  my school classes and long commute time, we're had some setbacks; but we are barreling forward again. Much gratitude goes to our three sons who continue to help whenever they can even though they all have jobs/lives/families of their own.

To date:
     The second floor is complete (not the whole second story, just the floor)
     All windows are roughly framed in
     The second floor (main interior wall) is framed in.
     The bottom floor is wired and has electrical power.
     The entry door is installed (needs door knob)
     The small water heater (20 gal) has been purchased
     The ancient well has been modified

I'll start first with the last item and cover some of the other items in later blogs this week. The well. You might recall it was the original well probably built in the mid 1860's or so when the house was built. We had the option of leaving it in its crumbling state which was also dangerous due to its large opening at the top and decaying well house or modify it and make it safe. No permit required to keep it treacherous, go figure that logic out,  but $100 permit and inspection by the county health department required to modify it and bring it up to code.

Estimates on a new well were coming in at $16,000 and we couldn't leave the old one in its crumbling condition so we paid to have it modified. At a cost of about $2500 we now have a new cap. We also removed the old well house and secured the area around the well. Keith also managed to remove THREE big bull snakes who were enjoying their cozy life in that well house. No foul no harm, the snakes are beneficial for controlling farm mice and rats, but they were deported to the site of the old crumbling barn where they can work their magic without us having to view their long wriggling, sliminess.

Moving the well house was a creative challenge and the beam rising in the GBH was, and once again we were not sure what it was Keith had in mind to accomplish this feat but accomplish it he did, with help from son Colton. First a basic hay rack had to be maneuvered inside the old well house which was sitting on a very rickety, falling apart foundation of badly poured, thin concrete. To do this Keith cut out sections of the front of the well house and then after pushing the hay wagon in place he and Colton cut out the back side.


 This allowed them to jack up the well house onto several 2 x 4's, 2 x 8's, and 2 by whatevers they could find, to lift the house off its foundation.

Keith standing on the hay rack inside the well house.
 He then hooked up the truck to the hay wagon and began to slowly puuuullllll it forward and away from the well so the company we hired to modify it could get in and do their work.

GOING


GOING


GOING

GONE
Dang it if Keith's plan didn't work again. Well house removed! We'll repurpose it into a chicken coop next spring. Or perhaps make our own covered bridge feature for the farm.


Several pieces of metalergic history was uncovered with the well remodel, like this:


Which allowed me the opportunity to practice the very challenging creative writing I've been studying.


I don't have pics of the actual well revision which involved digging down several feet alongside it in order to remove century old tiles (I was in class that day) but the end result was a much safer well. We still must cover the pit that holds our pressure tank but Keith assures me...he has a plan for that as well.


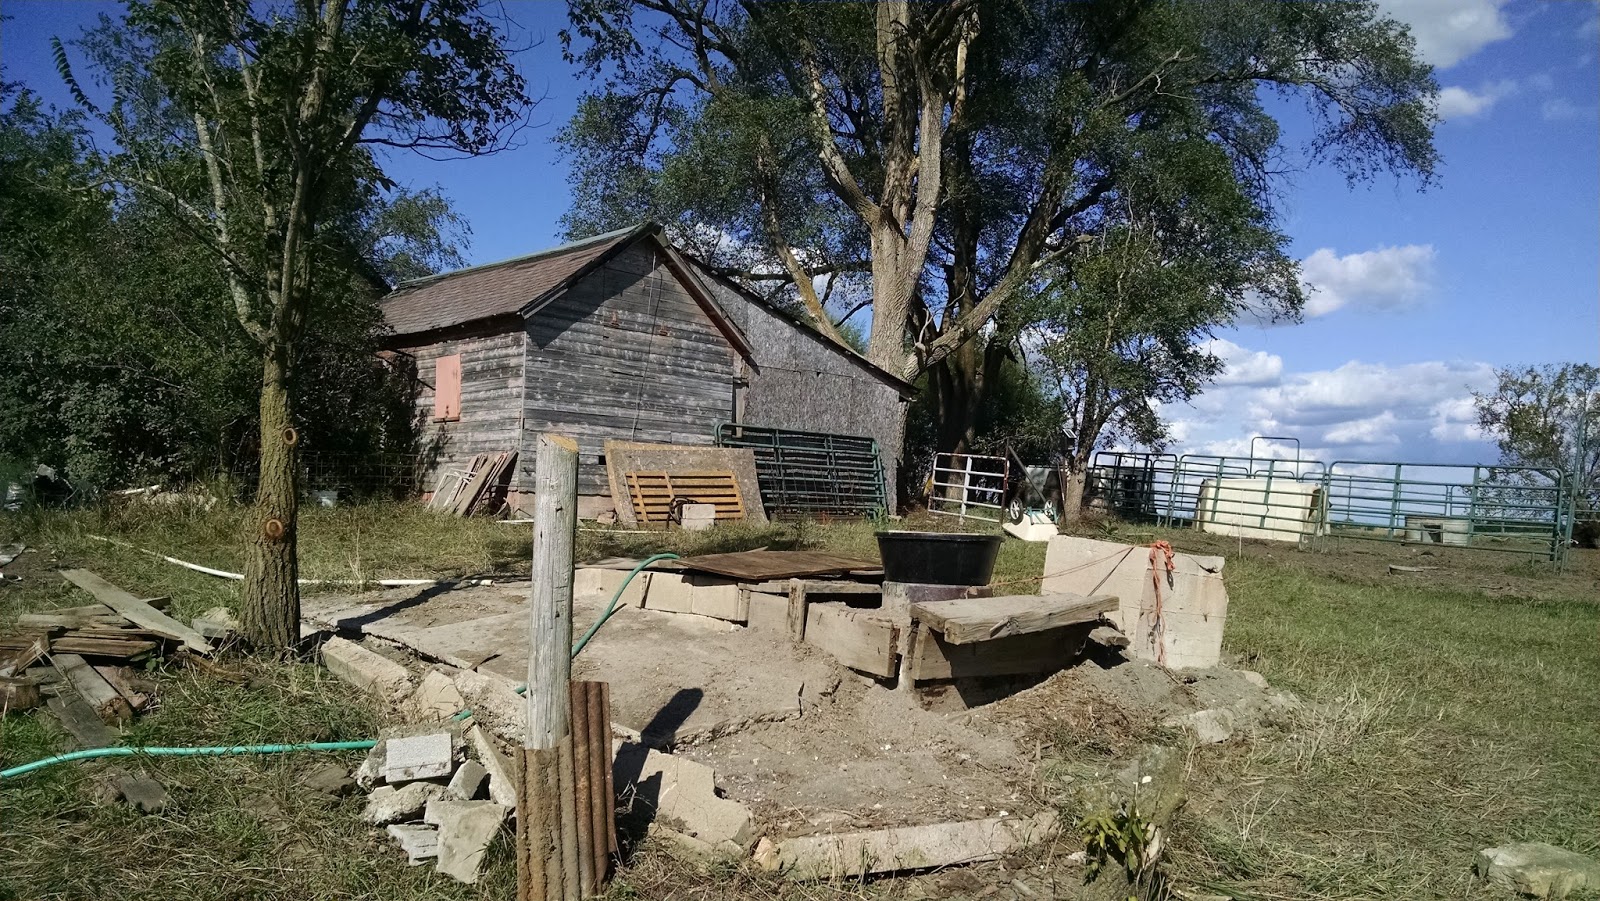
New sleeker, safer, well cap (green and white)
 just in front of pressure tank pit.

The old well with it's killer opening
Rubber pan and cinder blocks on
 top to prevent entire cows from falling in.


Monday, August 31, 2015

I am floored.

 
The perfectly beautiful, totally imperfect ship lap flooring
 We are definitely movin' on up, not to the East side but to the North. The second story of our grain bin house is being laid as I blog and it feels wonderful; as if-maybe-we'll be able to move in here before the first Illinois blizzard hits. We've given up the idea that we will be in before the first frost, unless of course first frost is delayed past its usual date of Oct 15 and extended to Nov. 15-but we're OK with that. It's easy to be OK with delays when the weather is sweet and the camper is not freezing. We'll see how positive our attitude remains when we have to break ice out of our coffee cups in the early am.

Our second floor is being built with reclaimed wood just like our floor beams and joists were. At a cost of roughly $500 we brought home Shiplap Flooring  from who knows where; old barns, old homes, old chicken coops even, through our "supplier" just down the road from us.  Each piece of wood is unique in its composition, size, amount of nail/screw damage etc. I'm painting the underneath portion of each board a flat white for deeply considered reasons; it was the cheapest at the hardware store.


To wash or not to wash that is the question

I am hopeful the flat of the white will pose a fine juxtaposition to the shimmer of the floor joists polyurethane. ("Juxtaposition" in a grain bin house--how pompass am I?)

Painting them proved a challenge as many were sporting decades of dirt. The first few boards I cleaned with a dry wire brush and then gave them two coats of paint. Then I got the bright idea that I should wash the boards. What a mistake. The more I washed the more dirt seemed to just ooze up through the grains. When I thought the boards were dry enough to paint after washing ...I did so but they held on to the water more than I thought and the dirt then melded in with the paint leaving rusty colored streaks. So those boards had to dry another few days and get another coat of paint.


Against the wall; the floor boards that were washed, then painted, a big mess.
 
I have to keep reminding myself, this is a recycled home with recycled materials. Nothing will or should look perfect.

It was indeed exciting to see Keith screw in the first floorboard. With son Jason helping to cut boards to length and then lift them up through the joists, it didn't take long to get about a third of the floor completed.

The first few boards of the second floor going down


Help from above...always good


View of ship lap floor boards from the first floor

Even more thrilling was walking up the steps, curved ones to the left of the landing, straight ones to the right and onto the actual second floor. It is now easier to visualize how the three small rooms up there might look. We've already decided to make our own bedroom smaller and the library area bigger.

We read more than we sleep.


Straight steps leading to the right of the landing


Curved steps to the left of the landing